
INTERNET BACKPACK
ABOUT THE INTERNET BACKPACK
Internet backpack or democratizing internet access is a project between Syracuse University faculties, SU students, DemoLab members, and ISOC foundation members. The project aimed to provide internet access to those who lacked access to the internet whether by disasters or poverty.

Quick Infographic
Internet Backpack Core Components

How to Operate a BGAN?
STEP 1
Press the power button on the BGAN, which is located next to the sim card slot and the two small LED lights.
STEP 2
Allow the BGAN to search for a connection, which will take some time. You may have turn/rotate the BGAN several times for the purposes of finding a connection. The BGAN will make sounds as it is trying to search for a satellite connection. Each sounds have different frequencies that indicate how the connection is going:
• Pulsing like a heartbeat normal frequency: Searching for connection
• Pulsing like a heartbeat faster frequency continual: It is closer to finding a connection.
• Continuous high pitch squeal: The connection has been found.
STEP 3
In order to make sure the BGAN connection is working, you will need to access the app Explorer Connect. This is also the same app you will use to control the BGAN itself.
First, open the Explorer Connect app and click the settings tab in the lower right corner. You will need to register the phone. This will require you to make a username and input the password, which is the serial number on the back of the BGAN.
After registering yourself, access the phone settings and click the WIFI tab. This is where you will connect to the BGAN hotspot by same password used to register (the serial number on the back of the BGAN). The BGAN connect is called EXPLORER510.
After you are connected, open the Explorer Connect again and select the “Terminal Access” where you will select “standard data”. Once the icon is green, this means that you are connected and can access the Internet. Another note is you will find that on the top of the phone screen, the WIFI icon will have a number next to it. This shows how many devices are connected to the BGAN hotspot.
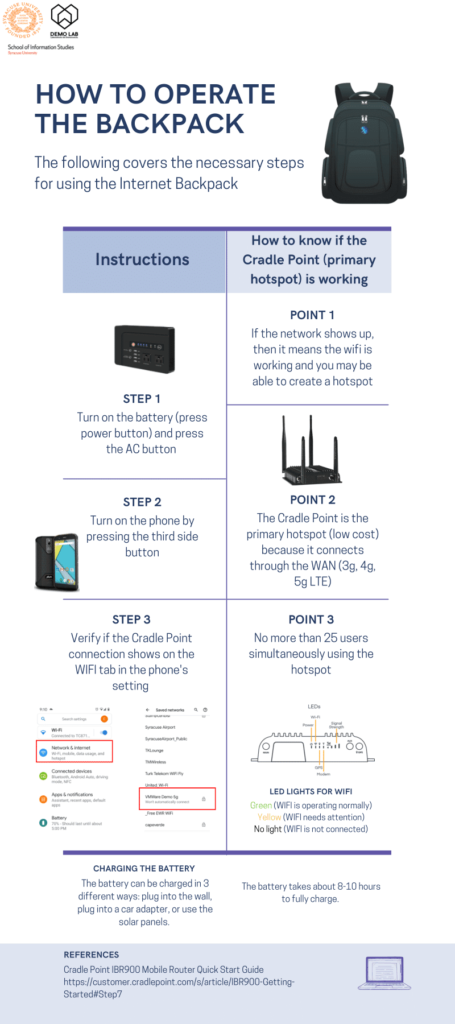
How to Operate Cradle Point?
STEP 1
Turn on the battery and press the AC button, holding it for a few seconds until a green light appears.
LED Lights for WIFI
Green (WIFI is operating normally)
Yellow (WIFI needs attention)
No light (WIFI is not connected)
STEP 2
Turn on the phone by pressing the third side button.
STEP 3
Verify if the Cradle Point connection shows on the WIFI tab in the phone's setting. If it is the first time connecting, you will need to input the password (*imcondemo) on the phone’s WIFI settings. The connection of the Cradle Point will be VMWare Demo 2.4g.
How to Charge the Internet Backpack?
The battery can be charged in 3 different ways: plug into the wall, plug into a car adapter, or use the solar panels. The battery takes about 8-10 hours to fully charge. Here's a video showing how to use the solar charging.
How to Install goTenna Mesh?
-
Charge goTenna Mesh fully before initial operation via the micro-USB port found beneath the power button. The indicator light on the front of the device will light up during charging and will turn off, when fully charged.
-
Install the goTenna app from the App store or the Play store onto your respective iOS or Android device.
-
Follow the instructions within the app to setup your goTenna Mesh.
-
Turn ON goTenna Mesh by pressing and holding the power button for ~3 seconds. Release the button and watch for the indicator light to slowly pulse. goTenna Mesh is now ready to pair.
How to Operate goTenna Mesh?
-
Follow instructions within the goTenna app to set up your goTenna contact number. Using your phone number as your goTenna contact number is recommended.
-
Proceed to text, share GPS location, or send other data over the app using regular text-messaging app conventions.
-
We recommend placing goTenna Mesh in an unobstructed position, preferably as high up as possible on your body. For example, goTenna will work best when attached externally to the upper back of a backpack using the provided attachment strap.
Net Cloud Manager
The login page can be accessed via this link
-
Home – includes reports for online/offline devices, data usage for WAN, WiFi as WAN, and ethernet WAN.
-
GeoView – displays a map showing the physical location of devices in an account (devices must have location services enabled to appear on the GeoView map). Those with exclamation points (!) signify that they are not connected at the moment. Green means the device is connected.
-
Uptime – for WANs, groups, and routers.
-
Modem Usage – modem data usage by carrier, group, and device, connected modem counts.
-
Clients – reports on clients connected to devices.
-
Traffic – traffic reports by categories, applications, routers, and clients.
-
Security – information about intrusion events and other security details.
-
Data Usage - breaks down data usage by devices, the number of clients connected per day and the type of device they are using (Desktop, laptop, etc).
For more information: link